The Form Builder module for WHMCS allows you to easily create custom forms for your WHMCS installation. Follow the steps below to create a new form:
- Log in to your WHMCS admin area.
- Navigate to the Form Builder Module:
- From the WHMCS admin dashboard, go to “Addons” -> “Form Builder”.
- Click on “Create New Form”:
- In the Form Builder module interface, locate the “Add New Form” button and click on it.
- In the form creation screen, you’ll be presented with various settings and options to configure your form.
- Form Name: Provide a descriptive name for your form. This will help you identify and manage multiple forms.
- Form Type: Choose your new form type.
- Data Collection: The Data Collection form type empowers clients to securely gather and store valuable information from their customers, ensuring efficient data management and enabling personalized services.
- Generate Invoice: With the Generate Invoice form type, clients can effortlessly create and customize invoices based on specific form settings, streamlining the billing process and ensuring accurate and timely payments.
- Ticket Helper: The Ticket Helper form type enables clients to conveniently collect and store relevant data related to support tickets, facilitating efficient ticket management and improving customer service by accessing comprehensive ticket information.
- Click on add form button to generate form.
- Drag and Drop Field Elements:

-
- On the form editing screen, you will see a left sidebar containing available field elements such as text, email, dropdown, checkbox, etc.
- To add a field to your form, simply click on the desired field element from the left sidebar and drag it to the form canvas area.
- Configure Field Settings:
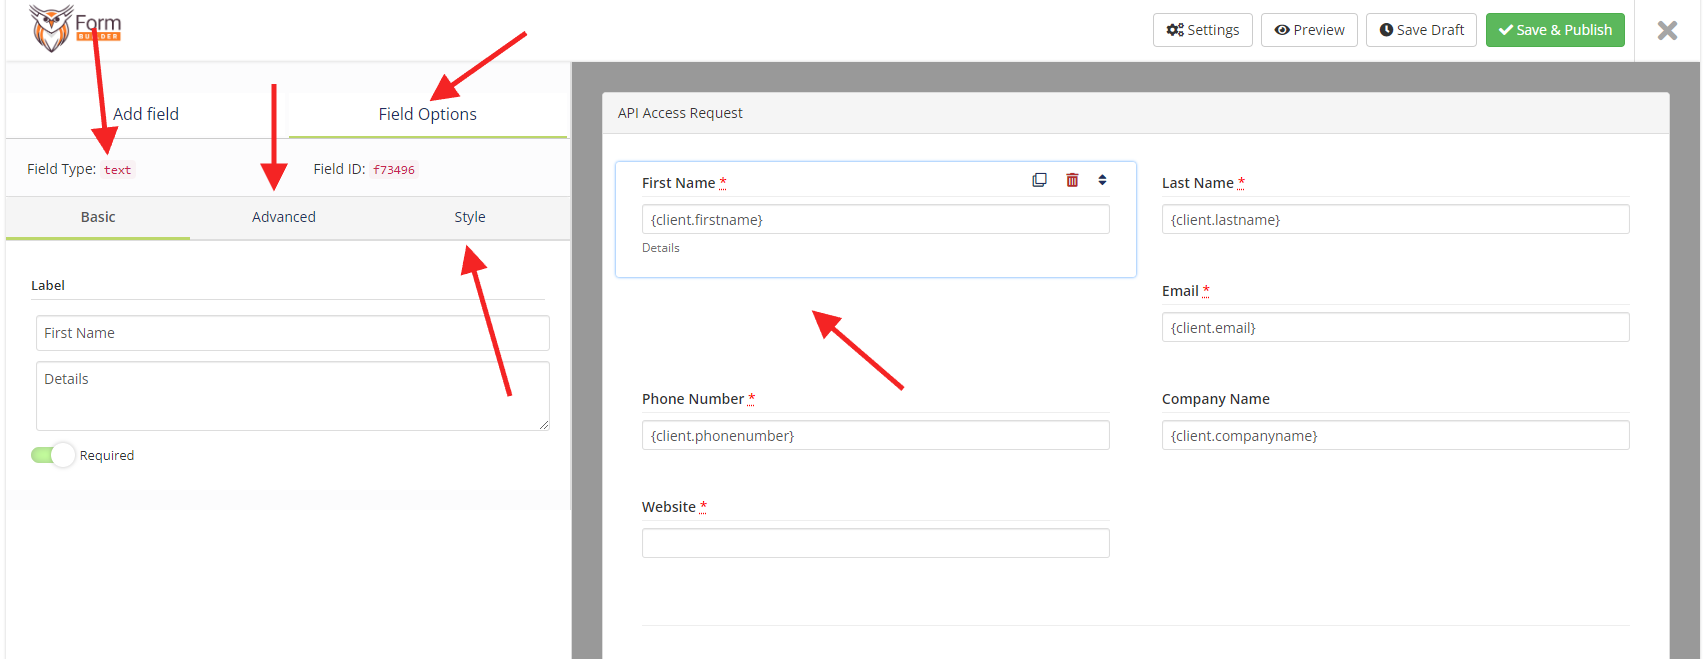
-
- After adding a field to the form canvas area, you can click on the field to access its settings in the left sidebar.
- The left sidebar will display the field’s settings, such as field label, layout ,options, and more. Modify these settings according to your requirements.
- Repeat the process of dragging field elements from the add field tab in the left sidebar and configuring their settings until you have built your desired form structure.
- Configure Form Settings:
General Tab:

-
-
- Title: Enter a captivating title for your form, which will be prominently displayed to users, providing a clear indication of the form’s purpose.
- Unique ID: Assign a unique identifier to your form, allowing you to easily reference and manipulate the form using CSS or JavaScript for advanced customization and interactivity.
- Description: Add a descriptive text that will appear at the top of your form, providing important instructions or additional information to users, enhancing their understanding and engagement.
- Submit Button Text: Specify the text that will be displayed on the form’s submit button, guiding users to complete and submit the form with a clear and compelling call-to-action.
- Submit Button Class: Customize the appearance of your submit button by adding a CSS class, allowing you to apply specific styles and visual enhancements to match your form’s design.
- Template: Create a personalized form layout by uploading a custom template file (in .tpl format) to the templates folder in module directory, enabling you to achieve a unique and visually appealing design.
- Form Access: Control who can access your form by choosing between allowing everyone or restricting access to logged-in clients only, ensuring the desired level of privacy and security.
- Store data in database: Choose whether to store the data submitted through the form in the database, allowing for easy retrieval and analysis, or opt not to save data if not required for your specific needs.
- Database Data Encryption: Enhance data security by encrypting the client data stored in the database, ensuring sensitive information remains protected from unauthorized access and adhering to privacy regulations.
-
Confirmation Tab:

-
-
- Message: WHMCS admins can customize a text message that will be displayed to clients after submitting the form, allowing personalized and informative post-submission communication.
- Message with Redirect: WHMCS admins have the flexibility to add a custom text message along with a redirection feature. After clients submit the form, they will be redirected to a specified URL after a selected number of seconds, offering a seamless transition to relevant content or next steps.
- Redirect: This method exclusively redirects clients to a designated URL immediately after submitting the form, ensuring a prompt and focused redirection experience that directs clients to a specific destination or webpage.
-
Notification Tab:

-
-
- Admin Email: Select a WHMCS email template of your choice to receive email notifications whenever clients submit the form. This ensures that you promptly receive the submitted form data directly in your inbox, facilitating efficient communication and follow-up actions.
- Submitter Email: Choose a WHMCS email template to automatically send an email to the client who submitted the form. This feature enables you to acknowledge and confirm their submission, providing a seamless and professional communication experience.
-
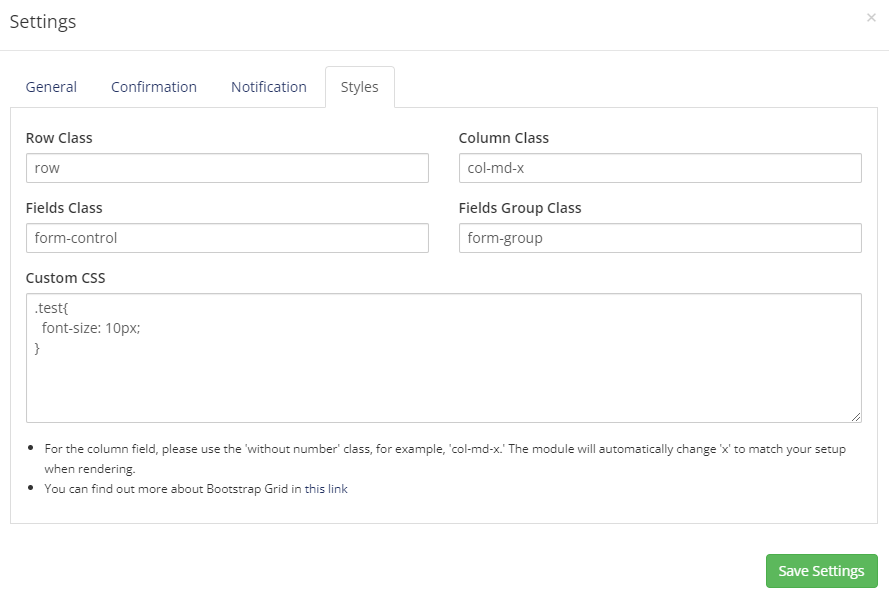
Styles Tab:
-
-
- Row Class field: Choose a custom class to apply to all form rows, allowing you to define specific styles and formatting for the entire row.
- Column Class field: Specify a custom class for all form columns using the ‘without number’ class format (e.g., ‘col-md-x’). The module will automatically adjust ‘x’ based on your column setup when rendering.
- Fields Class field: Select a custom class to be applied to each individual form field, enabling you to style them consistently or add additional customization.
- Fields Group Class field: Assign a custom class to field groups within the form, allowing you to apply specific styles or formatting to groups of related fields.
- Custom CSS: Add your own custom CSS code to the form page, giving you full control over the visual appearance and allowing for advanced customization.
-
- Preview:
- You able to preview your form by just click on preview button in top header.
- Save and Publish:
- Once you have finished configuring your form, click the “Save Draft” or “Save & Publish” button to save your changes and make the form available for use.
- Manage and Edit Forms:
- You can manage and edit your created forms by accessing the Form Builder module interface and selecting the desired form from the list of available forms. Make any necessary changes and save your modifications.
Congratulations! You have successfully created a new form using the Form Builder module for WHMCS. Your clients can now use the form to submit information or inquiries through your WHMCS client area or your website.
